
How to Replace a Two-Handle Kitchen Faucet
About This Project
This project involves the complete removal of an old two-handle kitchen faucet and the full installation of a new one. The process begins with shutting off the water supply, disconnecting the old hardware, cleaning the sink deck, mounting the new faucet, connecting the new water lines, and finally, testing for leaks and proper operation.
Best for advanced DIYers and professionals with basic plumbing knowledge and familiarity with power tools. Requires Safety Glasses and RIDGID Safety Glasses-Amber RSG-Y and MCR Safety BearKat Safety Glasses MCSCRWBK110.
Tools & Materials

Unger 6 Gal. Heavy-Duty Plastic Bucket DB02

Towel
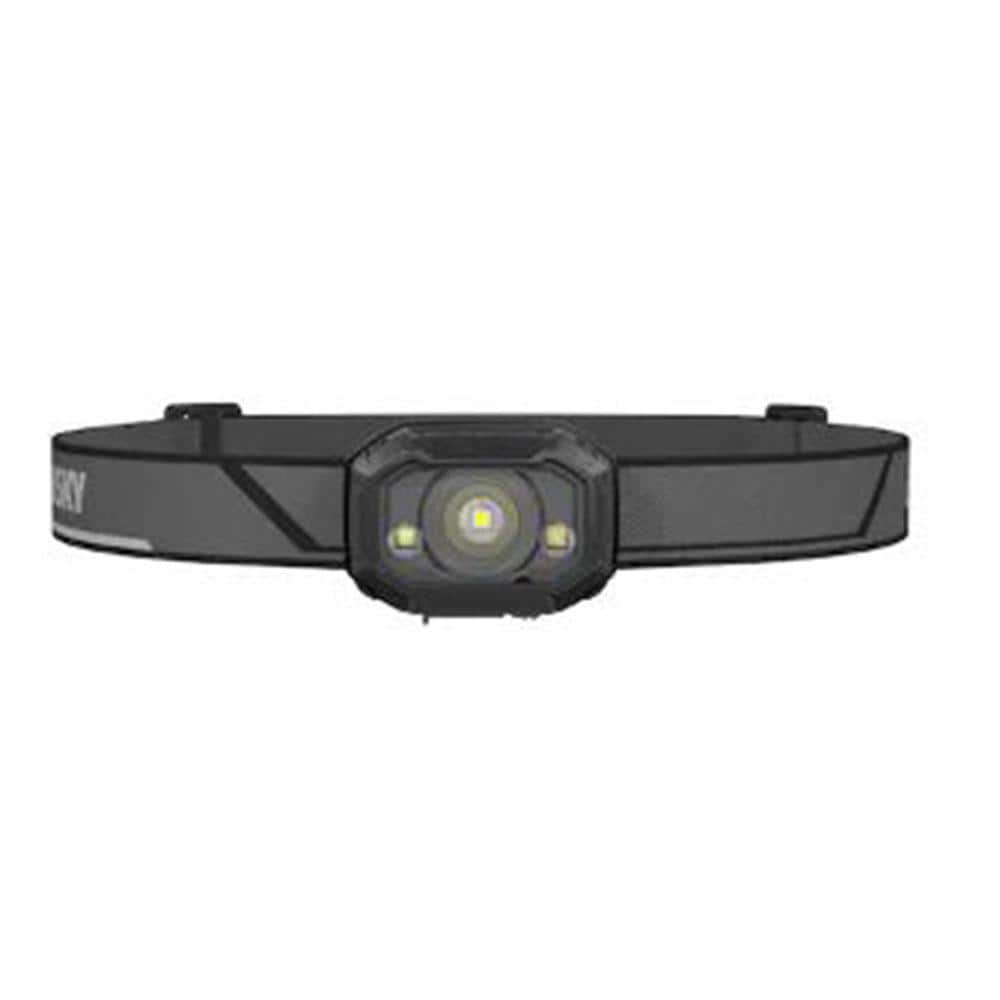
Husky 400 Lumens LED Micro Rechargeable Headlamp PVL-HLP-0004

Safety Glasses

Bucket
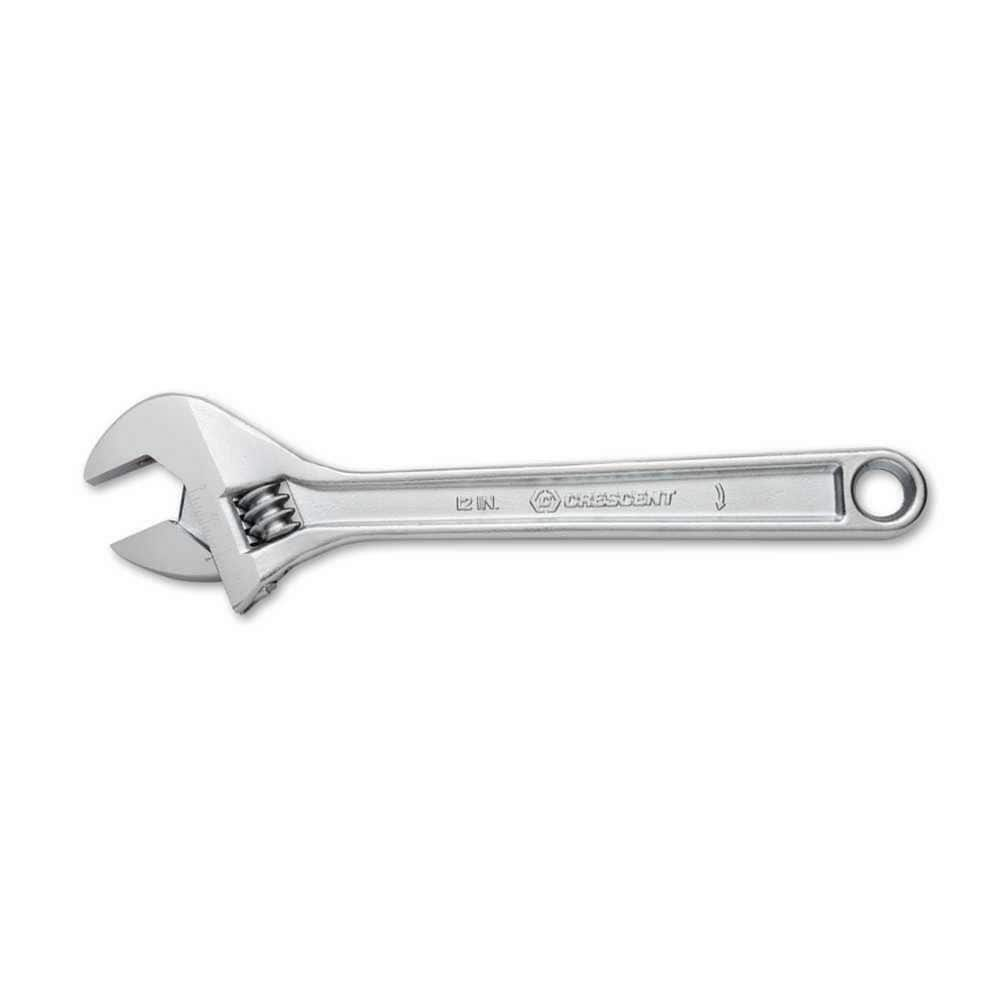
Crescent 12 in. Chrome Adjustable Wrench AC212VS
Unger 6 Gal. Heavy-Duty Plastic Bucket DB02
The Unger 6-Gallon Heavy-Duty Professional Cleaning Bucket holds more than 6 Gal. of liquid. The bucket can accommodate a scrubber up to 14 in. L. This bucket features measurement marks and 2-pour spouts
Towel
Absorbs moisture and dries surfaces.
Husky 400 Lumens LED Micro Rechargeable Headlamp PVL-HLP-0004
The Husky 400 Lumens Micro Rechargeable Headlamp packs superior brightness in a compact size. This rechargeable headlamp provides crisp, clean color illumination. The headlamp has 8-light modes, including
Safety Glasses
Keeps eyes safe from potential hazards.
Bucket
Ideal for carrying or storing liquids.
Crescent 12 in. Chrome Adjustable Wrench AC212VS
Since the introduction of the original Crescent wrench in the early 1900s, the Crescent brand has become synonymous with adjustable wrenches. Crescent Adjustable Wrenches feature a large knurl for easy
Steps
Prepare Workspace and Shut Off Water
15 minsBegin by completely clearing out the cabinet under the kitchen sink to create ample working space. Place a bucket directly underneath the faucet's water connections to catch any dripping water. Lay down several old towels to absorb any spills. Locate the two water shutoff valves, one for hot water (typically on the left) and one for cold (on the right). Turn the handles clockwise until they are fully closed. Once closed, turn on the old faucet handles to relieve any pressure in the lines and confirm that the water flow has stopped completely.
Disconnect Water Supply Lines
20 minsPosition your bucket under the supply line connections. Using a basin wrench for hard-to-reach nuts or an adjustable wrench for accessible ones, loosen the coupling nuts that connect the flexible supply lines to the threaded tailpieces of the old faucet. Turn the nuts counter-clockwise. Once loose, you can usually unscrew them the rest of the way by hand. Be prepared for a small amount of water to drain out. Let the lines drop into the bucket.
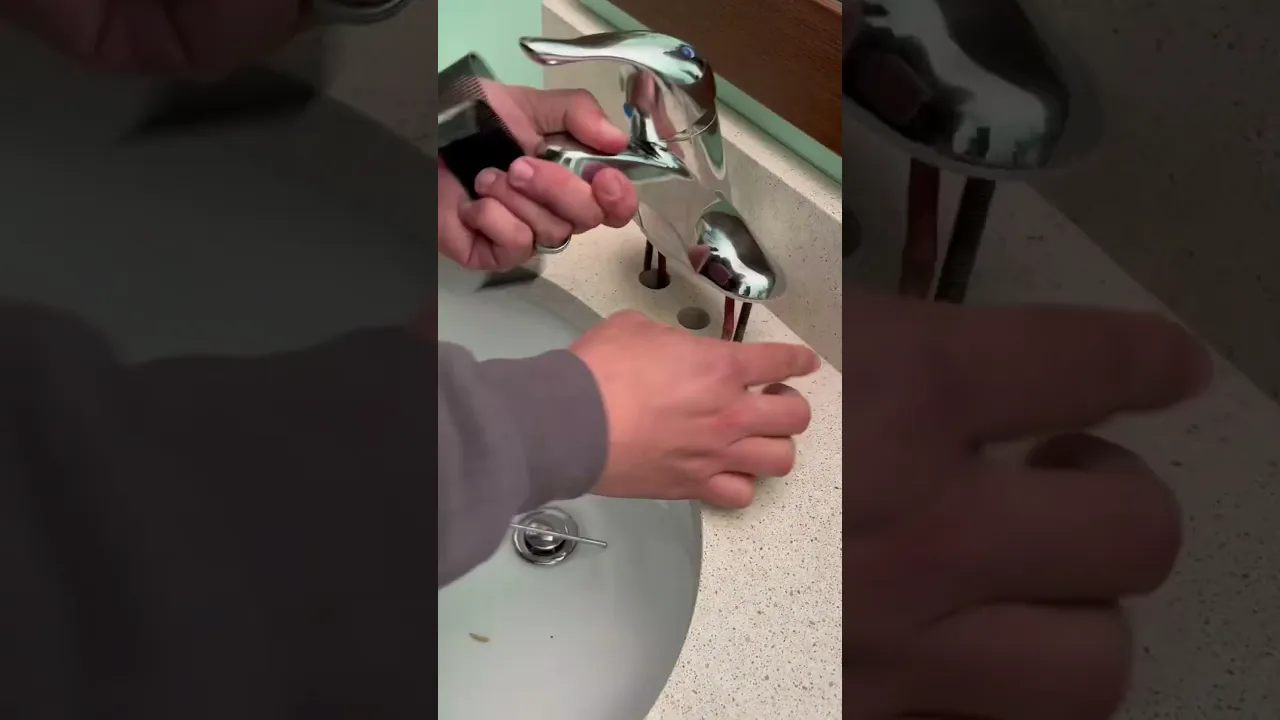
Remove the Old Faucet
30 minsUsing the basin wrench, locate and loosen the mounting nuts that secure the old faucet body to the underside of the sink. These can be plastic or metal and are often corroded and difficult to remove. If there is a separate side sprayer, you will also need to disconnect its hose from the main faucet body and unscrew the nut holding its base in place. Once all nuts are removed, the old faucet assembly should be free to be lifted straight up and out from the top of the sink.
Clean the Sink Surface
15 minsWith the old faucet removed, use a plastic putty knife to gently scrape away any old plumber's putty or sealant from the sink surface. Spray the area with an all-purpose cleaner or a mineral deposit remover and scrub thoroughly with a non-abrasive scrub sponge. Wipe the area clean and dry it completely with paper towels. A clean, smooth surface is essential for the new faucet to seal properly.
Mount the New Faucet
25 minsUnpack your new faucet. If it comes with a base gasket, place it over the faucet holes. If not, apply a 1/4-inch rope of plumber's putty to the underside of the faucet base. Carefully feed the faucet's tailpieces and any attached hoses down through the correct holes in the sink deck. From underneath the sink, slide on any supplied washers and thread the mounting nuts onto the tailpieces. Hand-tighten them to hold the faucet in place. Install the side sprayer base in its hole, feed the hose through, and secure it with its nut from below.
Connect Water Supply and Sprayer Lines
20 minsFrom under the sink, attach the hot and cold water supply lines to the corresponding faucet tailpieces (hot on the left, cold on the right). Hand-tighten the coupling nuts, then use your basin wrench or adjustable wrench to give them an additional quarter to half turn. Do not over-tighten. Connect the other end of the supply lines to the shutoff valves if you are replacing them. Connect the side sprayer hose to its designated port on the faucet body, often a quick-connect fitting.
Turn on Water and Check for Leaks
15 minsSlowly turn both water shutoff valves counter-clockwise to turn the water back on. Use your flashlight to carefully inspect every connection point: where the supply lines meet the shutoff valves, and where they connect to the faucet tailpieces. Also check the base of the faucet on top of the sink for any water seepage. Place a dry paper towel under the connections to make tiny drips more visible. If all is dry, turn the faucet handles on, test both hot and cold water flow, and operate the side sprayer. Perform one final check for leaks while the water is running.
Common Problems
Older valves can sometimes fail to seal completely after being turned. Always double-check that the water flow has stopped before proceeding.
Solution: To avoid this issue: Be mindful of this warning and take appropriate precautions.
Ensure the valves are completely closed before proceeding to avoid water damage.
Solution: To avoid this issue: Be mindful of this warning and take appropriate precautions.
Difficulty fitting all faucet parts under the sink.
Solution: Make sure you have enough room for all system components before starting the installation.
Confirm that the water has completely stopped flowing from the faucet before disconnecting any hoses.
Solution: To avoid this issue: Be mindful of this warning and take appropriate precautions.
Dropped screws falling down the drain, requiring difficult retrieval.
Solution: Closing the sink drain is a simple but crucial step that can prevent a lot of frustration if a small screw is dropped.
Confirm the water is off by briefly opening a faucet elsewhere in the house or by observing that no water drips from the pipes once cut.
Solution: To avoid this issue: Be mindful of this warning and take appropriate precautions.
Be careful not to over-tighten the supply line connections, as this can damage the seals.
Solution: To avoid this issue: Be mindful of this warning and take appropriate precautions.
Frequently Asked Questions
Do I really need a special basin wrench, or can I just use a regular adjustable wrench for this project?
While an adjustable wrench is useful for visible connections, a basin wrench (like the TEKTON or Husky models listed) is highly recommended. Its long, telescoping handle and pivoting jaw allow you to reach and loosen nuts in tight, awkward spaces under the sink that a standard wrench cannot access. This tool significantly simplifies the removal and installation process.
What are the most important safety precautions to take when replacing a kitchen faucet?
The most crucial step is to completely shut off the hot and cold water supply lines to your sink before starting any work. Ensure you have a bucket and towels handy to catch any residual water, and use proper lighting (like the listed flashlight) to see clearly in the confined under-sink area. Never try to force connections without proper alignment, as this can cause damage.
The project is rated "beginner." Is it truly manageable for someone with no plumbing experience?
Yes, this project is beginner-friendly because it primarily involves disconnecting and reconnecting parts, not complex pipe cutting or soldering. The most challenging aspect is often working in confined spaces under the sink. Take your time, follow the instructions carefully, and ensure all connections are hand-tightened before a final wrench turn to avoid cross-threading.
What should I do if I can't get the old faucet nuts or supply lines to loosen?
Old nuts can be stubborn due to corrosion or mineral buildup. First, try applying penetrating oil and letting it sit for a few minutes before using your basin wrench for leverage. If still stuck, a hacksaw or oscillating tool might be necessary to carefully cut the old nuts or lines, but proceed with extreme caution to avoid damaging the sink or existing plumbing.
How can I ensure I don't have leaks after installing the new faucet?
After making all connections, slowly turn the main water supply back on while carefully watching for drips. Check every connection point, especially where the supply lines meet the faucet and the shut-off valves. If you spot a leak, gently tighten the connection a quarter turn at a time until the leak stops, but avoid over-tightening which can damage washers or threads.
My old faucet left a lot of residue and gunk on the sink deck. How do I clean it effectively before installing the new faucet?
Thoroughly cleaning the sink deck is crucial for a good seal. Use the plastic paint scraper to remove larger chunks of old caulk or putty. For stubborn residue, apply a product like Goo Gone or a similar adhesive remover, let it soak, and then scrub with a Scotch-Brite Zero Scratch sponge. A clean, smooth surface helps prevent future leaks and ensures a professional finish.
What if my new faucet's supply lines aren't long enough or don't fit my shut-off valves?
Faucet kits often come with standard supply lines, but sometimes longer or different sizes are needed. Before starting, measure the distance from your faucet connections to the shut-off valves. If your new faucet's lines are too short or the connectors don't match (e.g., 3/8" vs. 1/2"), you'll need to purchase compatible braided stainless steel supply lines, like the Plumbshop ones listed, with the correct lengths and end fittings.


